



photo 3am_home_1_zpsd47b2810.png photo 3am_MJ_1_zpsdb43188f.png photo 3am_TS_1_zps32b65946.png photo 3am_NL_1_zps4f84c04a.png
Showing posts with label Winter. Show all posts

Snow Puffy Paint

I'm so thankful my little Reagan is feeling much better. So, today we made snow paint! This is another WAY simple activity to do in celebration of winter. Not only did Reagan love making snowflakes and snowmen using the puffy paint, the whole rest of my crew loved it as well....yes - even the big kids! By the time we were done my kitchen was plum full of kids... :) If this can hold to attention of big mean teenagers, that is something special! It made my momma heart proud... :)


This paint is really cool! It looks like a super light frosting, but it dried puffy. Reagan was so tempted to try it since it really looked like frosting, but he didn't... :) Here he is smelling it because we included some peppermint extract in it....YUM!


So here is what you need. You probably can find the stuff you need between your house and school.......yeah you know you steal stuff from home for these type things!


Materials:
Elmer's Glue
Shaving Cream
Iridescent Glitter (optional) - if you want it to be glittery
Peppermint Extract (optional) - if you want it to smell yummy
Construction Paper
Paint Brushes - although my daughter discovered that a spoon actually works better
Bowl

How To Make It: 
Mix equal parts of white glue and shaving cream. We didn't measure anything. We just mixed it until it was well mixed. It won't really feel puffy. It gets puffy as it dries which is COOL and your kids will be super surprised! We used a whole 7oz. bottle of glue and probably 2 cups of shaving cream. Then, we mixed in glitter and a wee bit of peppermint extract. Reagan loved mixing it, but he did kind of slop it. You may want to do the mixing or put it in a bigger bowl. He was crazy with the mixing, but he had such a good time. He felt like he was helping me bake something... :)

That's it! Then, simply use the mixture as paint... We painted snowmen, snowflakes, and even our names!


We used construction paper to make the pieces for the snowman. It sticks right to the paint - no extra glue needed!

Look at that smile on Reagan's face! Even big sister, Bailey had to get in on the action!


 I had Reagan cut the pieces for the snowman himself. He had to think about what color made sense and he free cut the pieces. I think sometimes we get too caught up in things looking "cute" instead of the process that kiddos go through in making them. I wanted him to do his own thinking about how to make the snowman's nose, hat, boots, and buttons.... He noticed that this nose was too big, but he liked it! The paint is puffy but doesn't really weigh the paper down and it doesn't run....so don't worry!!


The finished products! 


Real Snow.....(well almost)


I wanted to show you a real simple activity I did with Reagan today....before he came down sick. :(

I've told you before that my little 5 year old, Reagan, is in love with snow.... he remembers when it snowed here last year and has been not-so-patiently waiting for it to return. I found this idea for making fake snow at Growing a Jeweled Rose. It looked simple enough and we've used shaving cream paint before (and loved it) so we decided to give this a shot!

This is probably the simplest thing to make. It literally takes 2 ingredients! baking soda and shaving cream. We had both of these already at the house so we were ready to get going and didn't spend a dime on it!


 You just mix the 2 together! I used a 1 lb box of baking soda. I used maybe 3/4 of a can of shaving cream. I didn't measure anything. We just mix until it felt right. This was also a great way for me to talk to Reagan about what was happening.... when the mixture got too wet, Reagan would figure out we needed more dry (baking soda)....if it was too dry and turning to powder, we'd use more wet (shaving cream).


See - you can see in his eyes, he was starting to feel bad. :(

 But, look at his intensity. He was sooo "into" this snow!

 Ah...yes! A snowball!!! He worked so hard figuring out how big he could make the snowball.

He was so proud of his snowball!

Here - he was working on making double snowballs at the same time. He quickly realized that you need 2 hands to make a really good snowball - to pack it down.....

We loved the naturally cold feeling of this "snow".... YES! It really IS cold! It's also so silky smooth so it's a great sensory activity. Reagan loved the texture... HECK! I LOVED the texture and found myself constantly playing with it.... Reagan played this all afternoon.

This would be a great fun activity to do in the classroom after reading The Snowy Day or The Mitten

Here's the only sad thing.......... shortly after Reagan started running a fever... :( Look at my sick baby....:(


The Mitten (Giveaway)

Hi Friends! So.....how are you enjoying winter? heheheh - don't slap me... It was a joke, really.. :) Here in Texas it's been pretty cold and miserable, but I know nothing compared to the majority of the country. I can't even fathom temperatures and windchills in the negatives!!!

Snow really is a beautiful weather event (if you are safe at home of course). We don't get nearly enough here. Reagan keeps asking when it's going to snow......

So I think it's a perfect time for me to show you my "The Mitten" unit and host a giveaway. Do you totally love the Jan Brett book, The Mitten? It's one of my absolute favorites and is always a big hit in the classroom. It's about this boy who loses a mitten. Then, a series of animals squeeze into the mitten to keep out of the cold weather. In the end, all the animals burst out of the mitten.....which is by then stretched WAY out of shape.... hehehe --- it's funny and a great way for kids to connect with this wonderful season. :)


The Mitten


Here are some sneak peeks into this unit.....
This is an activity for measuring area -- using snowballs! (yes they are actually cotton balls, but the kiddos love use them and pretending they are snowballs)....


 These pieces are wonderful! I have kids make retelling headbands by gluing the pieces in sequential order on a long sentence strip. Easy peasy headband.....kids can wear it home and them tell the story to their families!


Sorting cvc - real and nonsense words....then record them!

Here is a great phonemic awareness activity - Sound Spotting...where do you hear that sound?


And an emergent reader that matches the book (but at an easier level). It prints as a double book which makes it easier to print for your class! :)

Now - could you use this unit? I hope so!

Check it out here:


Well you have a chance to win it!! I made it beyond easy. I am just asking you to follow me on TpT and Facebook to enter this giveaway - that's it!!! So.....what are you waiting for???? ENTER!! :)


a Rafflecopter giveaway

Salt Painting


We have been having so much fun over our break doing easy art/crafty projects! Emphasis on the easy!!!! Tonight we decided to try salt painting. I found 2 wonderful posts showing how to do it. Take a look over at The Moffatt Girls and Juggling With Kids for more info. They did a great job and really inspired me to give it a try!

It is super easy, super fun - but it's all about the process because you won't want to save it. TAKE PICTURES and enjoy the activity with the kids. After the paint dries it looks kind of bleh...... but it's such a great activity. My kiddos wanted to do picture after picture....so it was a definite hit! Again - I love this activity even more because it all about the process....It's so important that we take time to do "process" projects and not always worry about making a product.

Here's what you need:

Materials:
*constructions paper
*white glue
*table salt
*paintbrushes
*food coloring
*small containers

Directions: 
1. Use the glue to draw a picture on the construction paper. We drew snowflakes and Reagan's name. 
2. Pour table salt onto the picture. Shake the salt around the paper like glitter.....to cover all the glue. Then, shake the excess salt in the trash. 

3. Dip a paintbrush into a paint container. I used rubber baking cups because I had them laying around. I added 5-6 drops of food coloring to a few tablespoons of water. We talked about how to make colors like purple and orange.
4. Tap the salt with your paintbrush. You will see your kids' eyes LIGHT UP. Not only was Reagan astounded by the paint "chasing" the salt.....my 13 year old daughter Bailey was just as excited. It is almost like magic to watch the food coloring to spread across the salt. The whole time I heard "Wow", "Oh look what happened", "Watch this!"...... A good time was had by all... yes even me!

Here is a glimpse into our salt painting evening..... :)

 This was a really great fine motor activity. Reagan worked hard squeezing the glue out to make just the perfect picture. Then, he worked carefully to tap the food coloring onto the salt -- without pushing too hard into the glue.


"Real" Snowflakes...

I mentioned in my last post that my 5 year old, Reagan is obsessed with all things snow. He was super disappointed when Christmas came and went and still no snow (it was like 60 degrees)... So, my mission this break has been to have "snow" much fun with him! ahahaha -- yes that was totally corny! :)

Yesterday I found this post on Steve Spangler Science all about how to make crystal snowflakes using just Borax and boiling water.... simple enough, huh? Plus, I found this really short and easy to understand video.... I was all set!


A couple of tips:
1. Use pipe cleaners of several different pastel colors. I sent my husband and teenage son to Walmart to get pipe cleaners......they came back with red. Yeah, because red totally screams winter snowflakes. {Sigh} If you want it done right, you gotta go do it yourself. So, I made a trip to Michaels and found some beautiful pastel blues, green, purples......

2. Buy the wooden dowels. I tried to make due with pencils.... they weren't long enough. Again, another trip to Walmart.

Once I had the things I needed, this project was super easy!


Materials:
  • Borax Laundry Booster 
  • Pipe Cleaners (I used white and pastel blue, purple, green)
  • String
  • Wooden dowel
  • Large Container
  • Boiling Water
  • Scissors
Directions:
1. Cut a pipe cleaner in thirds. Take those three pieces and twist, twist, twist. Pull the 6 arms of your snowflakes out straight. Bam! That's it! 

2. Tie a string to each snowflake. You will then tie the other end of the string to the wooden dowel.  

3. Drop them in wide pan. I used a boiling pot. The wooden dowel sits across the top of the pot. 

4. Let them sit over night. In the morning, you will see what happened!


Here are the finished crystals! Oh I totally love these! They look so cold (but they aren't)....just beautiful crystals. They are hard too.... Reagan was fascinated with holding these up in the sun to watch them shine even more. 


The thing I really loved about this project is after dipping the snowflakes in the solution, you just leave them alone. Don't even bother looking at them until the next morning. You will be pleasantly surprised by your beautiful crystal snowflakes. 

DIY - Sparkly Snow Playdough

So, what is a mom to do on the weekend before Christmas?

 Here it is cold, rainy, and windy. Not a fun time to play outside. Reagan is convinced that he made it snow last Christmas (first time in 37 years it had snowed here on Christmas day). He had begged for it and it came! So, naturally he believes he "made" it snow. He thinks he can make it snow this year too. I don't have the heart to tell him we are forecasted to be in the mid-50's here on Christmas. I had to think of another way to create snow for Reagan... So, my little one and I decided to try our hand at snow playdough.

Here's how we did it:

Materials:


1 cup of flour
1/2 cup of salt
2 tbsp of cooking oil
2 tsp of cream of tartar
1 cup of water
1 tsp of peppermint extract (optional but smells oh so good!)
iridescent glitter (optional but makes it sparkle)


Directions:
Mix all the dry ingredients together. In a small pot, heat the oil until bubbling. Remove the hot oil from the heat and mix in the water and the peppermint extract. Then, mix the dry ingredients. Return to a low heat and stir continuously until it begins to get firm like playdough. BAM! Done! Put in a little glitter if you like... :) This stuff literally takes 5 minutes to make.


I let it cool a little on some wax paper.

I let Reagan be the glitter mixer! He wanted to pour the glitter, but I used my better judgement... :)


One happy fella!


He was a very happy boy playing with his snow playdough. He played with it all day and we placed it in a zip-loc baggie for tomorrow!


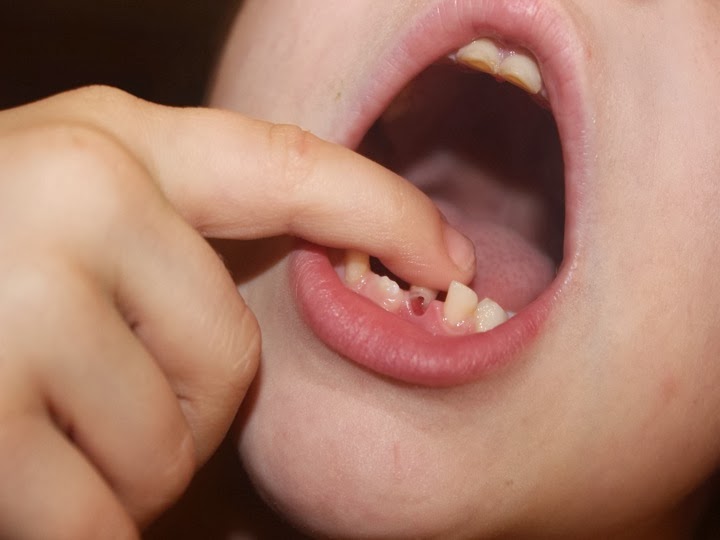
Oh, and I just had to show you Reagan's second loose baby tooth! You can even see the first one growing in beside it. I love 5 year olds! :)